Finding leads is not the hard part anymore. Finding leads that are actually worth your time is the part that separates a useful sourcing workflow from a folder full of digital clutter.
If you sell on Amazon, you are going to lose ASINs. Products go out of stock. Brands get restricted. Amazon jumps on listings. Competition shows up, tanks the price, and makes everyone question their life choices for a few minutes.
That is why you need a steady top-of-funnel sourcing process. Not one magical product. Not one "best ASIN." A wide, repeatable system.
The goal is simple: start with good leads, filter out the obvious junk, import the remaining products into 3P Mercury, and let automation handle the checks that would take forever manually.
If you would rather watch the process instead of reading it step by step, see the video here: Bulk sourcing walkthrough
Step 1: Start With The Right Kind Of Product
The best place to start is with products that already look like online arbitrage or retail arbitrage opportunities.
You are not looking for private label products. You are not looking for a brand selling only its own product. You want products that are commonly resold by multiple sellers.
Good starting points often include:
- Grocery-store brands
- Walmart or Target-style brands
- Health and beauty products
- Household goods
- Products with multiple third-party sellers
- Listings where Amazon is not the main competitor
The reason is straightforward: if several sellers are already competing on a product, there may be more products like it in their storefronts.
This is storefront stalking, but done in bulk instead of one painful click at a time.
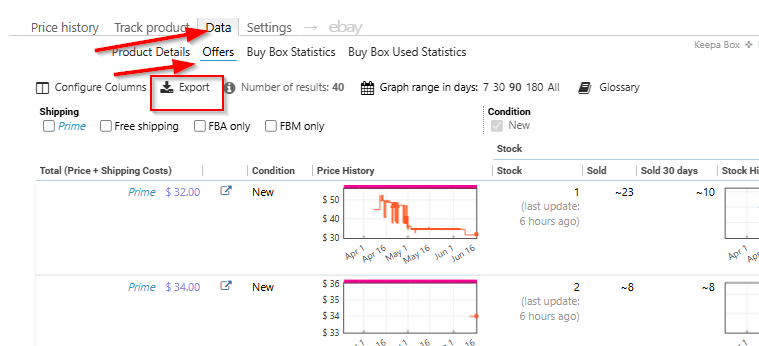
Step 2: Pull Seller IDs From Keepa
Once you find a product that looks like an arbitrage-style listing, open the product in Keepa and go to the offers data.
From there, export the active offer data. Before exporting, make sure your Keepa columns include the seller ID. That seller ID is the important piece.
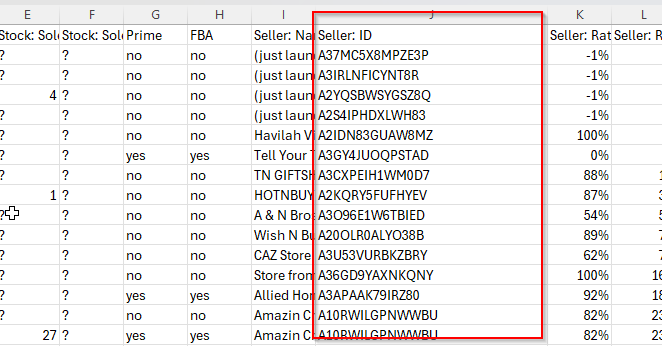
After exporting, open the CSV and copy the seller IDs. You do not need every column. For this workflow, the seller IDs are what help you find more products from sellers who are already active on similar listings.
Step 3: Use Keepa Product Finder To Expand The List
Next, go to Keepa Product Finder and paste those seller IDs into the seller ID filter.
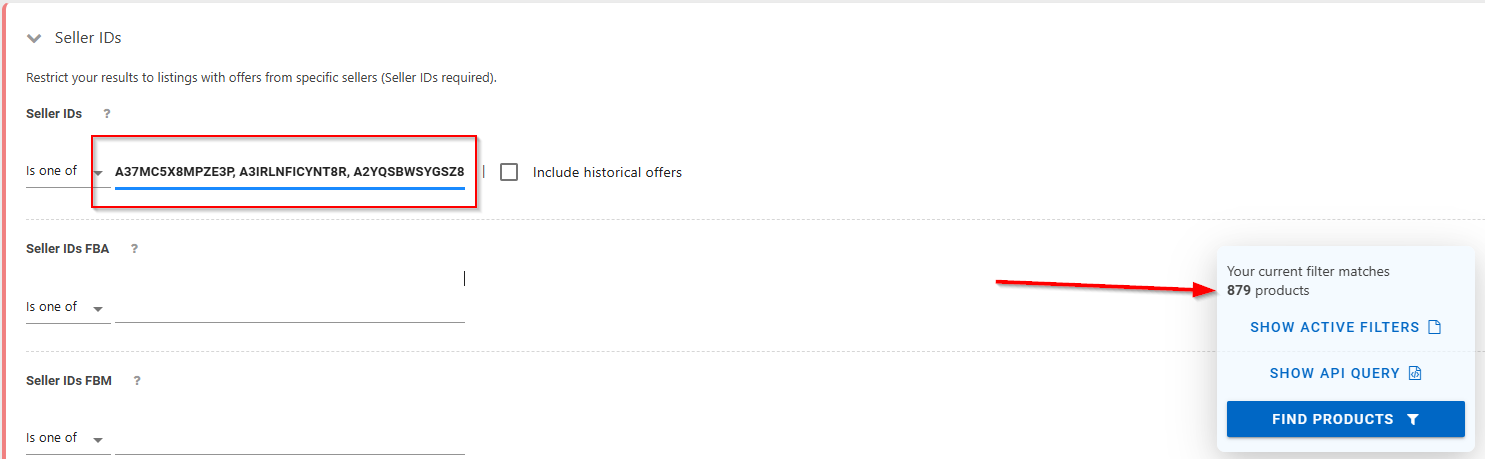
This can return thousands of products. That sounds exciting until you remember that thousands of products can also mean thousands of bad ideas wearing tiny disguises.
Before exporting anything, filter the list down.
Useful filters include:
- Amazon out of stock or not competing
- Products with recent sales
- Products with meaningful monthly sold data
- Products with reasonable size and weight
- Products that do not look like private label listings
- Products with enough demand to justify review
One of the most important filters is velocity. If a product does not move, it does not matter how interesting it looks. You do not want to spend time sourcing a product that ranks like it has taken a long nap.
Filtering inside Keepa matters because it prevents you from dumping low-quality products into the rest of your workflow.
Step 4: Export The Cleaned Product List
After filtering, export the results from Keepa.
Make sure you export enough rows. If Keepa is showing 700 results but your view is only set to 100, exporting only the visible rows may leave most of your list behind.
For a sourcing scan, you usually need the basics:
- Title
- ASIN
- Buy box or price reference
- Any fields required by your sourcing tool
You can clean up the file before sending it into a reverse sourcing tool. The point is not to create a perfect spreadsheet. The point is to create a usable list of pre-filtered products that already have some reason to be reviewed.
Step 5: Run The List Through A Sourcing Tool
Tools like ArbaSource, Nepeto, or similar reverse sourcing software can help locate supplier matches for the ASINs you exported.
This is an initial scrub. It will not find everything. That is normal.
The software may find a portion of the products, and those matches can be imported into 3P Mercury. The remaining ASINs can still be useful, especially for manual sourcing later.
That part matters. Some of the best products are not the easiest ones for scraping tools to find. If software finds every source instantly, it probably found it for a lot of other sellers too. That is not always bad, but it is not exactly a secret doorway.
Step 6: Import Leads Into 3P Mercury
Once you have a lead file, import it into 3P Mercury's Lead Vault.
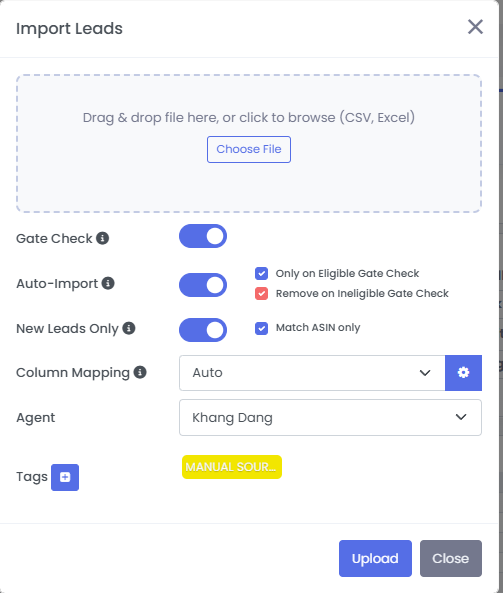
During import, use settings that help keep your database clean:
- Turn on gate check.
- Auto-import only eligible leads.
- Remove leads that fail the eligibility check.
- Skip products already in your database.
- Match by ASIN when appropriate.
- Add tags so you know where the leads came from.
Tags are more useful than they seem at first. If you buy lead lists, use multiple sourcing tools, or test different workflows, tags help you track which sources actually produce profitable opportunities.
Without tags, everything becomes "that one file from Tuesday," which is not a management system. It is a cry for help with a timestamp.
Step 7: Let 3P Mercury Handle The Gate Check
The gate check is one of the biggest time savers.
Instead of manually checking every product to see whether you are eligible to sell it, 3P Mercury can run that check during import and only keep the leads that pass your settings.
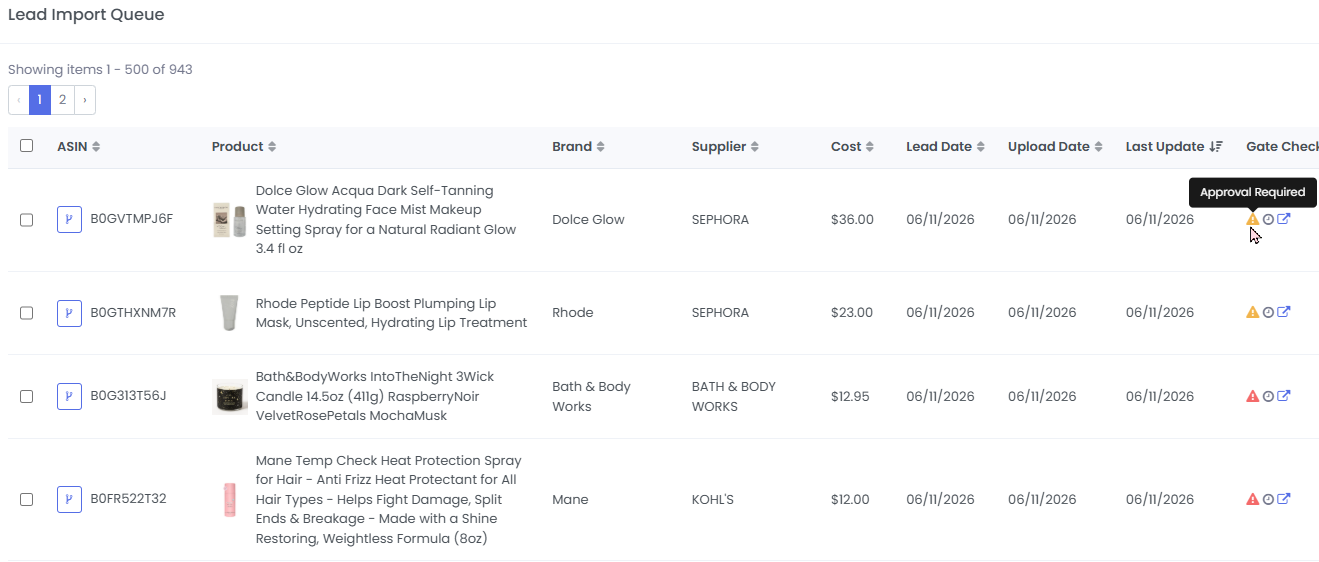
This prevents you from wasting time sourcing products you cannot sell. It also makes your Lead Vault cleaner from the beginning.
The point is not just to collect leads. The point is to collect leads you can actually act on.
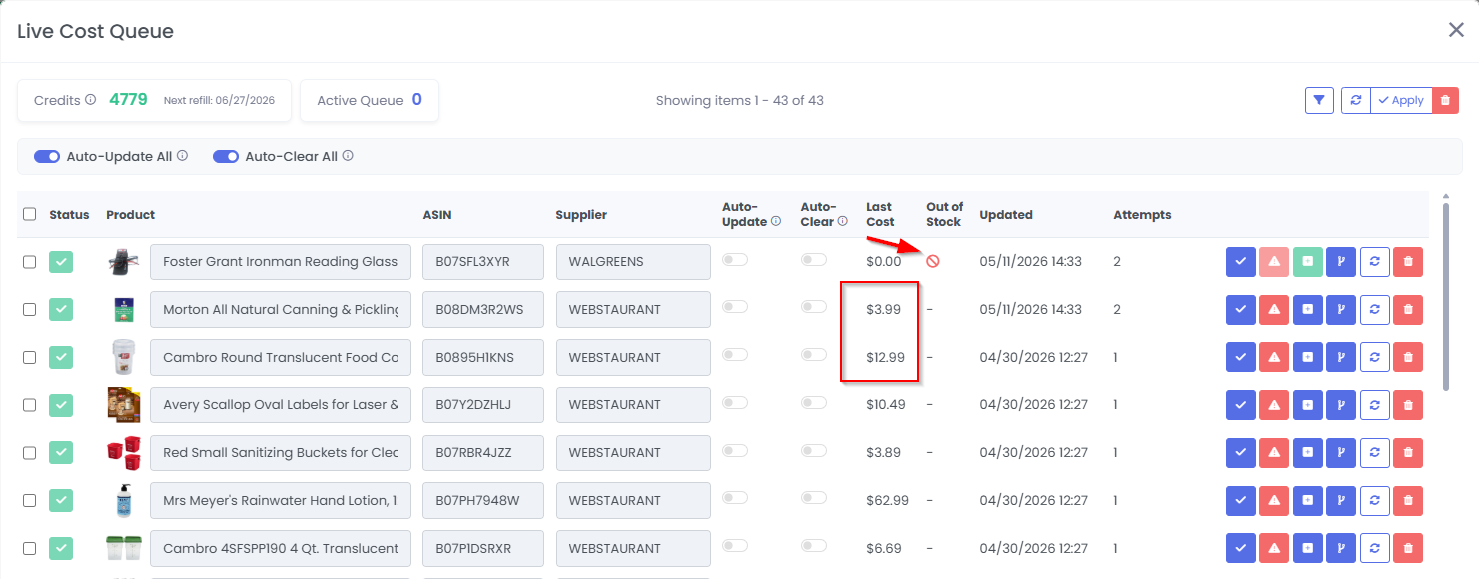
Step 8: Track The Leads Over Time
A lead that is not good today may become good later.
Competition changes. Sellers run out of stock. Prices recover. Amazon leaves listings. Supplier costs change. A product that looked crowded last month may become interesting again when the seller count drops.
This is where 3P Mercury becomes more than an import tool. It tracks your leads over time, updates listing data, and helps you find opportunities later instead of forgetting about them in a spreadsheet.
You can also use live cost features to check supplier pricing, stock status, and updated costs for products you want to monitor.
Step 9: Do Not Ignore Manual Sourcing
Bulk sourcing gets you speed. Manual sourcing can still get you depth.
After a reverse sourcing tool finds the obvious matches, you can import the original filtered ASIN list into 3P Mercury and remove duplicates. Then the remaining ASINs can be handed to a VA or reviewed manually.
This is where a lot of sellers find stronger long-term products. Manual sourcing is not glamorous. It is closer to watching paint dry while holding a calculator. But it can uncover products that automated tools miss.
Final Takeaway
Bulk sourcing works best when you start with better inputs.
Do not dump random products into a sourcing tool and hope the results magically become good. Start with arbitrage-style listings. Pull seller IDs. Use Keepa Product Finder. Filter for demand, Amazon competition, and product quality. Then import the cleaned list into 3P Mercury so it can handle gate checks, duplicate removal, tagging, tracking, and ongoing lead review.
That is how you build a wider, safer lead funnel without manually clicking through every product like it is 2014.
Simplify Your Reselling Workflow
Sign up for 3P Mercury to simplify your business. The one software that takes you from sourcing to shipping, automated with the power of AI.
Sign up for 3P MercuryIf you want to see these steps in action, watch this video to see it in action: WATCH VIDEO